Welcoming

Warm Welcome !!!
Showing posts with label PC Tips. Show all posts

Friday, October 29, 2010

ভাইরাস থেকে নিরাপদে থাকার জন্য আপনার পিসির অটোরান বন্ধ রাখুন

লিখেছেনঃ অনিক হোসেন । তারিখঃ ০৩/০৯/২০১০

অনেক সময় ইচ্ছা না থাকা সত্ত্বেও কম্পিউটারে সিডি, ডিভিডি, কিংবা পেনড্রাইভ ব্যবহার করার প্রয়োজন হয়ে উঠে। কিন্ত সেই প্রয়োজন যদি হয় বিপজ্জনক তাহলে তো বিরক্তি লাগাটা অস্বাভাবিক কিছু নয়। আসলে বেশিরভাগ ভাইরাস এই সমস্ত ডিভাইসগুলো পিসিতে কানেক্ট করানোর সাথে সাথে সয়ংক্রিয়ভাবে ছড়িয়ে পড়ে কম্পিউটারের  বিভিন্ন জায়গায়।


2010-09-03_141508

তাই সয়ংক্রিয়ভাবে ভাইরাস ছড়ানো থেকে পিসিকে নিরাপদে রাখার জন্য আপনি চাইলে আপনার পিসির রিমূভএবল ডিভাইসগুলোর অটোরান বন্ধ করে রাখতে পারেন। যাতে করে কোন রিমূভএবল ডিভাইস পিসিতে কানেক্ট করানোর পর, সয়ংক্রিয়ভাবে আপনার পিসিতে ভাইরাস ছড়াতে না পারে।

চলুন সেটিংসটি করে নেই

১। Start Menu > Run এ গিয়ে gpedit.msc লিখে এন্টার দিন।
২। Group Policy নামে একটি Window আসবে।
৩। Computer configuration > Administrative Templates > System Commend দিন।
৪। ডানপাশে অনেকগুলো Options দেখা যাবে।
৫। Turn off Auto play তে ডাবল ক্লিক করুন ফলে নতুন একটি Window আসবে
৬। Enable এবং All Drives নিবার্চন করে Apply > Ok করুন।

Auto Play

৭। পূর্বের সেটিংস এ পিরে যেতে ৬ নং Option এ থাকা অবস্থায় Not Configured করে দিতে হবে।

বিঃদ্রঃ- এই ট্রিক্সটি শুধুমাত্র সয়ংক্রিয়ভাবে ভাইরাস ছড়ানো থেকে আপনার পিসিকে নিরাপদে রাখবে। সুতরাং পেনড্রাইভে প্রবেশ করার পূর্বে অবশ্যই পেনড্রাইভ স্ক্যান করে নিন।এটা শুধু এক্সপি ব্যবহারকারীদেরই কাজে লাগবে কারণ ভিস্তা ও সেভেনে Control Panel>Programs>Default Programs থেকেই Autoplay নিয়ন্ত্রন করা যায়।

অনুসরন: বিজ্ঞান প্রযুক্তি.com

Monday, September 20, 2010

Interesting Tips About Your PC [Part Two]

https://blogger.googleusercontent.com/img/b/R29vZ2xl/AVvXsEgSzC0cdg4gP0SYuXYJMvd14YqxlLzCkelaRk5T8LnJfmEqW7vBLVkHt_haovcfAvAD9W19fFv2dJnohCrQxJLs4YYL5AbqVtEIQhhzVd9vEpTTPnbIKrA7KtFFC9etSeBqQej5CMdOxE_9/s400/untitled.jpg

Speed up your internet by 20%
Microsoft reserves 20% of your available bandwidth for their own purposes like Windows Updates and interrogating your PC etc.

You can get it back:

Click Start then Run and type “gpedit.msc” without quotes.This opens the group policy editor. Then go to:
Local Computer Policy
then Computer Configuration
then Administrative Templates then Network then QOS Packet Scheduler and then to Limit Reservable Bandwidth.
Double click on Limit Reservable bandwidth. It will say it is not configured, but the truth is under the ‘Explain’ tab i.e.”By default, the Packet Scheduler limits the system to 20 percent of the bandwidth of a connection, but you can use this setting to override the default.”
So the trick is to ENABLE reservable bandwidth, then set it to ZERO. This will allow the system to reserve nothing, rather than the default 20%.It works on Win 2000 as well.

Increase the speed of your internet connection
As more and more people get quick connections to the internet, such as cable or ADSL, it becomes apparent to the user of a simple dial-up modem that the World Wide Web can quickly turn into the World Wide Wait. Here a trick that can help speed up your current modem without shelling out the big bucks.
There is a setting located in your windows registry called the Maximum Transfer Unit (MTU). This determines the size of the packets of data sent between your and your server. In Windows 95, this setting is has a value of 1,500 bytes when the actual size of internet packets is 1,000 bytes. This can sometimes slow things down. To remedy the situation, simply follow these steps:
In the registry editor (Start > Run > regedit.exe), navigate to HKEY_LOCAL_MACHINE\System
\CurrentControlSet\Services\Class\NetTrans.
In the NetTrans folder you should find another folder named “000x” in which x represents a fourth digit. Right-click on the “000x” folder and select New and StringValue. Rename the item that appears in the panel on the right side to MaxMTU, then double-click it to bring up the Edit String box and give it a velue of 1002.Remember to keep playing with the MaxMTU value until you feel that your internet connection has greatly sped up. Some people report huge speed gains using this tricks, while others hardly notice a difference. In any case, it’s definetly worth a try.

Multiple login in yahoo Without Using any Software
You can login with multiple id’s on the same yahoo messenger without any download or patch. Follow these steps:

1. Go to Start —-> Run . Type regedit, then enter .
2.Navigate to HKEY_CURRENT_USER ——–> Software —>yahoo —–>pager—->Test
3.On the right page , right-click and choose new Dword value .
4.Rename it as Plural.
5.Double click and assign a decimal value of 1.
Its done!!
Now close registry and restart yahoo messenger and try Multiple Login

How to find the IP address of the sender in Gmail

1. Log into your Gmail account with your username and password.
2. Open the mail.
3. To display the headers,
* Click on More options corresponding to that thread. You should get a bunch of links.
* Click on Show original
4. You should get headers like this:
Gmail headers : name
Look for Received: from followed by a few hostnames and an IP address between square brackets. In this case, it is note..
When you receive an email, you receive more than just the message. The email comes with headers that carry important information that can tell where the email was sent from and possibly who sent it. For that, you would need to find the IP address of the sender. The tutorial below can help you find the IP address of the sender. Note that this will not work if the sender uses anonymous proxy servers.
65.119.112.245.
That is be the IP address of the sender!
5. Track the IP address of the sender

Finding IP address in Yahoo! Mail

1. Log into your Yahoo! mail with your username and password.
2. Click on Inbox or whichever folder you have stored your mail.
3. Open the mail.
4. If you do not see the headers above the mail message, your headers are not displayed. To display the headers,
* Click on Options on the top-right corner
* In the Mail Options page, click on General Preferences
* Scroll down to Messages where you have the Headers option
* Make sure that Show all headers on incoming messages is selected
* Click on the Save button
* Go back to the mails and open that mail
5. You should see similar headers like this:
Yahoo! headers : name
Look for Received: from followed by the IP address between square brackets [ ]. Here, it is 202.65.138.109.
That is be the IP address of the sender!
6. Track the IP address of the sender note….
When you receive an email, you receive more than just the message. The email comes with headers that carry important information that can tell where the email was sent from and possibly who sent it. For that, you would need to find the IP address of the sender. The tutorial below can help you find the IP address of the sender. Note that this will not work if the sender uses anonymous proxy servers.

WHO IS INVISIBLE IN YAHOO MESSENGER???
The following two tricks lets you see who is invisibe in yahoo messenger.without his or her knowing that you are aware of his or her presence.This is a working trick.
Trick 1::::::::
..1..Open the conversation window of the person..whom you suspect to be online.
..2..click on IMvironments.find doodle from the imvironments.click on it
..3..you will see a screen..”Waiting for your buddy to load doodle”….Wait sometime
..4..After sometime if it is able to load….it means your so called buddy is online n he or she doesnot want to talk to you..
..5..if it doesnot load….you can be sure that he or she is really offline
also u can find it out by using www.xeeber.com

Multiple Log In Google-Talk

1. Right-click on the desktop
2. Select New
3. Select Shortcut
4. Paste this into the text box:
“c:\program files\google\google talk\googletalk.exe” /nomutex (dont miss even a comma)
5. Click Next. Name it whatever: Google Talk Multiple, etc.
6. Click OK until you are done.

RUN Movie In MS Paint
Hi.Run Movie in MS Paint
Hey all Pals, did you know that you can REALY watch movies in MS PAINT ?
Here’s what you gotta do :
1) Open your favorite movie palyer and play the move (I played the .mpg format in Winamp)
2) Hit “PrintScreen”, keep playing the movie in the player, dont stop it.
3) Open MsPaint.
4) Select “Edit>Paste” Or Hit “CTRL+V”
5) Presto! You can watch movies in Paint!
6) But there are no Pause, Next, Previous, Stop etc. buttons
7) Spead this fact to all your friends and show how COOL things you can do with Paint!
8) Experiment with other formats too, it doesn’t play DivX , Flash movies, etc.
Microsoft hasn’t revealed this i think. MsPaint is GREAT

Making Firefox More Faster
Dear Members!
I Just came accross this trick for Firefox. Mozilla firefox users would love this
Here is the trickfor mozilla firefox only)
1. Type “about:config” into the address bar and hit return. Scroll
down and look for the following entries:
browser.tabs.showSingleWindowModePrefs – true
network.http.max-connections – 48
network.http.max-connections-per-server – 16
network.http.max-persistent-connections-per-proxy – 8
network.http.max-persistent-connections-
per-server – 4
network.http.pipelining – true
network.http.pipelining.maxrequests – 100
network.http.proxy.pipelining – true
network.http.request.timeout – 300Normally the browser will make one request to a web page at a time.
When you enable pipelining it will make several at once, which really
speeds up page loading.Lastly right-click anywhere and select New-> Integer.
Name it “nglayout.initialpaint.delay” and set its value to “0″.
This value is the amount of time the browser waits before it acts on information it recieves.
If you’re using a brodband connection you’ll load pages 2-25 times faster now.

Increase internet speed using notepad

1. Open Notepad.
2. Copy the following code to the Notepad.
[HKEY_LOCAL_MACHINE\SYSTEM\CurrentControlSet\Services\Tcpip\Parameters]
“SackOpts”=dword:00000001
“TcpWindowSize”=dword:0005ae4c
“Tcp1323Opts”=dword:00000003
“DefaultTTL”=dword:00000040
“EnablePMTUBHDetect”=dword:00000000
“EnablePMTUDiscovery”=dword:00000001
“GlobalMaxTcpWindowSize”=dword:0005ae4c
3. Save the file as NetSpeed.reg or what ever name you want but the extension should be .reg.
4. If you run the file means it asks for “Do you want to add the following entry to the registry”
5. Press Yes
6. Reboot your PC.
7. Feel the difference…
Hope you enjoy it with speed.

Instant access to websites
Few websites need USERNAME and PASSWORD to access it completely.
If you are not willing to signup in those sites or you have no time and want instant
access then you have a solution just visit the website www.bugmenot.com type
the website URL for which u want user and psw you will find few username and passwords. Just use them.

Block websites in xp
Steps=>
1. Browse to C:\WINDOWS\system32\drivers\etc
2. Find the file named “HOSTS” .
3. Open it with Notepad.
4. Add 127.0.0.2 www.sitenameyouwantblocked.com , below 127.0.0.1 localhost line and that site will no longer be accessible.
5.To Unblock the Simple add # in front of line

Download video from youtube
Want to download any video from you tube.Just visit the this site,and enter the youtube video link.Thats all.
http://www.kissyoutube.com/
If you dont want to visit the above site.Than U can try this also.
1)Whenever you are watching video on YouTube, goto the address bar at the top of your browser.
Notice the URL is something like this: http://www.youtube.com/watch?v=stvW56
2)Just in front of the youtube.com domain name, insert the word kiss
Eg. http://www.kissyoutube.com/watch?v=stvW56
3)And Press the ‘Enter’ key and it will bring you to this website. Click on the download link provided to save the video to your computer.
NOTE: Remember to save your video with “.flv” extension. Eg. some_video_filename.flv.
Use the free flv player we recommend to play the video.
If you want to convert it into other format like .avi or mpeg.Than read here.
http://www.techiehome.org/viewtopic.php?t=560

How to make your pc work faster
Here you can find useful tips you can do to make your pc work faster in a few minutes , just follow these tips and you will definitely have a much faster and more reliable PC!

Quote:
1. Wallpapers: They slow your whole system down, so if you’re willing to compromise, have a basic plain one instead!

2. Minimizing: If you want to use several programs at the same time then minimize those you are not using. This helps reduce the overload on RAM.

3. Boot Faster: The ‘starting Windows 9x , xp’ message on startup can delay your booting for a couple of seconds. To get rid of this message go to c:\ and find the file Msdos.sys. Remove the Read-Only option. Next, open it in Notepad or any other text editor. Finally, go to the text ‘Options’ within the file and make the following changes: Add BootDelay=0. To make your booting even faster, set add Logo=0 to remove the Windows logo at startup.

4. Restart only Windows: When restarting your PC, hold down Shift to only restart Windows rather than the whole system which will only take a fraction of the time.

5. Turn Off Animations: Go to Display Settings from the Control Panel and switch to the Effects Tab. Now turn off Show Windows Content While Dragging and Smooth Edges on Screen Fonts. This tip is also helpful with Windows XP because of the various fade/scroll effects.

6. Resolutions: If you are willing to do anything for faster performance from your PC, then try lowering your display resolution. The lower it is, the faster your PC

7. Start Up Programs: Windows can be slowed down when programs run on start up. To eliminate this, check your Start up folder. You can access it from the start menu: Start, Programs, Start Up. Another way to eliminate programs from loading even before Windows actually starts is by doing the following: Click on Start, then Run. Type msconfig. It will take quite a long time for this program to load, but when you finally see it on your screen, explore the different tabs. They all have to do with how quickly your PC boots, so select what you want, and uncheck what you don’t want!

8. Fonts: When Windows starts, it loads every single font in the Fonts folder. Therefore, the more fonts you have, the slower the booting process. To get rid of unwanted fonts, simply go to the Fonts folder under c:\windows and remove whatever you don’t want. Fonts that have a red letter ‘A’ as their icon are system fonts, so don’t delete them.

Increase your ram speed at no cost
Here I will give you a cool tip to increae your system RAM while working for no cost. Smile
So,here we go…….. Cool

1)Start any application, say window window media player.Start playing any song.
2)Now start the Task Manager Processor tab and sort the list in descending order on Memory Usage.
You will notice that Wmp.exe will be somewhere at the top, using multiple MBs of memory.
3)Now go back to media player and simply minimize it.
4)Now go back to the Task Manager and see where Wmp.exe is listed. Most probably you will not find it at the top. You will typically have to scroll to the bottom of the list to find Word.
Now check out the amount of RAM it is using.The memory utilization has reduced by a huge amount.
So,simple-minimize each application that u are currently not working on by clicking on the Minimize button and you can increase the amount of available RAM by a great margin.
Depending upon the number and type of applications you use together, the difference can be as much as 50 percent of extra RAM and all this is free of cost. Razz In any multitasking system, minimizing an application means that it won’t be utilized by the user right now.

This trick will allow you to create files and folders without any name
Just follow the following steps:
1.Select any file or folder.
2.Right click on it,press rename or simply press F2.
3.Press and hold the alt key.While holding the Alt key,type numbers 0160 from the numpad.
Note:Type the numbers 0160 from the numpad,that is,the numbers present on the right side of the keyboard.Dont type the numbers which are present on top of the character keys.
4.Press Enter and the nameless file or folder will be created.
Reason:The file or folder that seems nameless is actually named with a single space.
But what if you want to create another nameless file or folder in the same directory ?

For this you will have to rename the file with 2 spaces.Just follow these steps below:
1.Select file,press F2.
2.Hold alt key and type 0160 from the numpad.
3.Release the alt key.Now without doing anything else,again hold alt key and press 0160.
4.Press enter and you will have second nameless file in the same directory.
5.Repeat step 3 to create as many nameless files or folders in the same directory.

BLOCK WEBSITES WITHOUT ANY SOFTWARE

Steps1] Browse C:\WINDOWS\system32\drivers\etc
2] Find the file named “HOSTS”
3] Open it in notepad
4] Under “127.0.0.1 localhost” Add 127.0.0.2 www.orkut.com , and that site will no longer be accessable.
5] Done!
example :
127.0.0.1 localhost 
127.0.0.2 www.orkut.com-
www.orkut.com is now unaccessable

For every site after that you want to add, just add “1″ to the last number in the internal ip (127.0.0.2) and then the addy like before.
ie:
127.0.0.3 www.yahoo.com
127.0.0.4 www.msn.com
127.0.0.5 www.google.com
This also works with banner sites, just find the host name of the server with the banners and do the same thing with that addy.
Hope this small tutorial could keep you going in simple way of blocking websites..

How to Hide the drives(c:,d:,e:,a:…etc) in My PC
This is a great trick you can play on your friends. To disable the display of local or networked drives when you click My Computer.1. Go to start->run.2. Type regedit. Now go to: 

HKEY_CURRENT_USER\Software\Microsoft\Windows\CurrentVersion\Policies\Explorer

Now in the right pane create a new DWORD item and name it NoDrives(it is case sensitive). Now modify
it’s value and set it to 3FFFFFF (Hexadecimal). Now restart your computer. So, now when you click on My Computer, no drives will be shown(all gone…). To enable display of drives in My Computer, simply delete this DWORD item that you created. Again restart your computer. You can now see all the drives again. Magic……..lol….

Crack into admin a/c from limited account

Go to cmd prompt
type AT (time) /interactive “cmd.exe”
enter time in 24hr format
means if you want to enter 5.00pm then enter 17:00
then a new window of cmd will open at specified time
In new window type net(space)user
press enter
after this u will see some names on ur screen
notedown the name of admin acc
then type
net user (name of admin acc u want to crack into) *
e.g if the name of admin acc is john then type
net user john *
then it will ask u for new password
enter password of ur choice
and u got the admin password

Change your processor name
Trick – SHOW YOUR PC PENTIUM 5 OR MORE

GO TO START>RUN>TYPE
REGEDIT>HKEY_LOCAL_MACHINE>HARDWARE>
DISCRIPTION>SYSTEM>CENTRALPROCESSOR>0
ON RIGHT HAND SIDE, RIGHT CLICK ON “PROCESSOR NAME STRING” AND CLICK ON MODIFY
AND WRITE WHAT EVER YOU WANT

How to fix corrupted windows files in XP
This tutorial has been made so people that are having problems with corrupted files, can learn how to fix them easy.
Requirement:
1. Windows XP CD
Now, follow this steps:
1. Place the xp cd in your cd/dvd drive
2. Go to start
3. run
4. type “sfc /scannow” (without “)
Now sit back and relax, it should all load and fix all your corrupted file on win XP.

XP tricks !!!

https://blogger.googleusercontent.com/img/b/R29vZ2xl/AVvXsEgwmTgkluuMs2SiXK1XlhQl9IcnBix6RaKYkqDyVfqfzv8tfKt6EAu0A6HauUzfre3vKtFX-lkVciFcKKBicvBEb84sWCKLroFlEQH40D_sK8DHgiQ0l7o7exrweqd1mUasmiXVvkduEB4/s400/xp-tips-and-tricks.jpg

Hidden Programs In Windows Xp
1) Private Character Editor
This program is for designing icons and Characters(Alphapet)
Click :start
Then :run
type :EUDCEDIT

2) iExpress This Program is for converting your files to EXECUTABLE files
Click : start
Then : run
type : iexpress

3)Disk Cleanup
This program used for cleaning harddisk to offer space
Click : start
Then : run
type : cleanmgr

4)Dr Watson
This program Is for repairing problems in Windows
Click : start
Then : run
type : drwtsn32

5)Windows Media Player 5.1
Opens the old media player
Click : start
Then : run
type : mplay32

Program …………. CODE
_____________________
Character Map = charmap
————————————
DirectX diagnosis = dxdiag
————————————
Object Packager = packager
————————————
System Monitor = perfmon
————————————
Program Manager = progman
————————————
Remote Access phone book = rasphone
————————————
Registry Editor = regedt32
————————————
File signature verification tool = sigverif
————————————
Volume Control = sndvol32
————————————
System Configuration Editor = sysedit

Interesting Tips About Your PC [Part One]

Create Send To option for your favorite Folder!!!
Many times it is really very annoying to do cut & paste or copy & paste for your regular folders.For this we need a easy solution as we can directly send our data(movies, songs,or your relevant one ) in our favorite folder as we do by the right click and sending anything directly to Desktop, mail Recipient, My Documents or Pen Drive.
Now the solution for your problem is given below…..

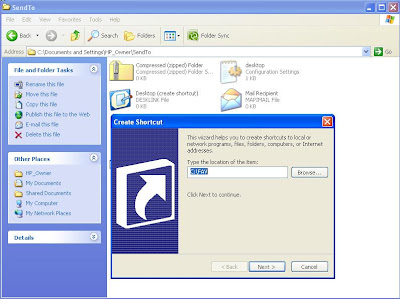
Step 1:Copy the Address of your desired folder from address bar for example if it is C:\FAV copy it(its location on ur hard drive)

Step 2:Goto C:\ drive,goto Tools–>Folder Option–>View–>Hidden Files and Folders–>Hide protected
operating system files(Recommended)–>Unhide Hide protected operating system files(Recommended)
#It will give a warning,don’t worry!!!

Step 3:Goto C:\Documents and Settings\Administrator\SendTo
#In place of Administrator its your User name
Step 4:Right Click –> New–> Shortcut.Paste The name of your desired folder in “Type the location of the Item” Text Field for Example C:\Fav –>Next–>Finish

SignUp with AlertPay

Step 5:Goto C:\ drive,goto Tools–>Folder Option–>View–>Hidden Files and Folders–>Hide protected
operating system files(Recommended)–>Hide Hide protected operating system files(Recommended)
#Step 5 is optional
You may browse ur desired folder also…..

Disable error reporting in XP

https://mail.google.com/mail/?ui=2&ik=8e06020d9b&view=att&th=12cb02e6f3e666f3&attid=0.1&disp=inline&realattid=f_gha5ls0o0&zw

If error reporting in XP is bugging you then turn it off.
When a system error occurs in XP, a little dialog box appears asking if you want to report the error to Microsoft.To disable error reporting, follow these directions:1. Right-click My Computer and choose Properties.2. Click the Advanced tab on your System Properties dialog box.3. Click the Error Reporting button on the Advanced tab.4. Place a checkmark next to “Disable error reporting.”5. Leave the other radio button unchecked next to the text labeled, “But notify me when critical errors occur.”6. Click OK.Hope you loved this useful post!!!!
Use Google to get Serial No of any Software
I know it is old but more of them don’t know this.
Most of the people downloading trial and using it, only after the expiration of trial they try for crack, Serial No, Keygen, Patch….But many don’t known where to get Serial No, Some websites may be infect your system with Trojan horse, Viruses, Adware, Spyware….
So for beginners this is a simply way to find hack with less effort and it saves time to, But make sure you have anti virus activated before trying to get some Serials, Patches to avoid data loss.

Just follow the steps as instructed below
  1. Go to http://www.google.com
  2. type this syntax in search bar ” 94FBR”
  3. Replace Product name with desired software and leave a space then type 94FBR
  4. Press enter, that's it
Now you receive Many pages which contains Serial no, Crack, Patches….
Just make a try, this simple trick works for many people

To delete a file which cannot be deleted
  1. Open a Command Prompt window and leave it open.
  2. Close all open programs.
  3. Click Start, Run and enter TASKMGR.EXE.
  4. Go to the Processes tab and End Process on Explorer.exe.
  5. Leave Task Manager open.(After this There will be no desktop icons and nothing is accessible but don’t worry this is due to shutting down of explorer)
  6. Go back to the Command Prompt window and change to the directory to where undeletable file) is located in.
  7. At the command prompt type DEL where is the file you wish to delete.
  8. Go back to Task Manager, click File, New Task and enter EXPLORER.EXE to restart the GUI shell.
  9. Close Task Manager.

Automatically rip a music cd when you insert it
  • Open Windows Media Player
  • Go to the menu at the top and choose Tools
  • From the drop down menu choose Options
  • Go to the copy music Tab
  • Put a tick in the box next to Copy CD when inserted
rip music cd
  • Press Change and you can browse for where you want to store your music that is ripped from cd’s.
  • You can also choose the quality of the audio file that your rip from the cd. A higher quality takes up more space.
  • Next time you insert a music cd Windows Media Player it will open and start ripping the music.
Notes:
  • Ripping your music to your computer allows you to put it onto an ipod or mp3 player.
  • If you decide to just listen to a music cd in your computer you will need to disable this auto ripping.

MegaUpload ToolBar Hacks
There is a grate tip to download from megaupload no need for download & Install That Toolbar.
ok 1st you want to Firefox browser to do that trick...
  1. open firefox……
  2. Goto Address bat and type “about:config”
  3. then search for “general.useragent.extra.firefox
  4. then double click on that ..
  5. change the default text with “Firefox/2.0 MEGAUPLOAD 1.0″
  6. You have Done It….!
  7. Now Download Without Any Toolbar
Add your own photo in My Computer properties
To do this:
  1. Open Notepad.
  2. Type the following:[General]Manufacturer=”Abdul Kader”Model=HP d530 SFF(DC578AV [Support Information]Line1= Your Ph NoLine2= Your Address…..
  3. Save as “oeminfo.ini” in the System32 folder.(Without Quote)
  4. Create a bmp file(Your Photo) and save it the System32 folder as “oemlogo.bmp”(Without Quote).
  5. Now Check your My Computer Properties.

Tuesday, September 14, 2010

How to remove Software Counterfeiting problem or Windows Genuine Validation problem

Tags: software counterfeiting, WGA, windows genuine validation


Hi guys…..Most of the people who are using windows XP OS will be facing the windows genuine validation problem or the Software counterfeiting problem.So now Iam going to explain you how to remove these things so that you will not get any such pop ups……
To get rid of the WGA notification that intends to remind you that your Windows is not validated, you can buy a validly licensed copy of genuine Microsoft Windows.
Update: Bypass WGA Validation and Disable WGA Notifications Warning Message
First Method
Launch Windows Task Manager.
End wgatray.exe process in Task Manager.
Restart Windows XP in Safe Mode.
Delete WgaTray.exe from c:\Windows\System32.
Delete WgaTray.exe from c:\Windows\System32\dllcache.
Launch RegEdit.
Browse to the following location:
HKEY_LOCAL_MACHINE\SOFTWARE\Microsoft\
Windows NT\CurrentVersion\Winlogon\Notify
Delete the folder ‘WgaLogon’ and all its contents
Reboot Windows XP.
Note: With this method, you may be prompted to install WGA Notifications again which can still be unselected.
Second Method
Note: Again, you may be prompted again to install WGA Notification, so it must be bypassed.
Third Method
By disabling and renaming the files “WgaLogon.dll” and “WgaTray.exe” in C:\WINDOWS\system32 folder by using the program Unlocker seems to get rid of all the nags/popups.
Fourth Method
Clear the contents or create a new empty data.dat for WGA, and make data.dat Read-Only and Hidden as detailed here.
The following step basically is the same with the above data.dat method, only different is that you no need to create any file in the WGA data folder:
Launch Windows Explorer and go to C:\Documents and Settings\All Users\Application Data\Windows Genuine Advantage\data
Go to Tools -> Folder Option -> View.
Select (click) Show Hidden Files and Folders option.
Unselect (uncheck) Hide Protected Operating System Files option.
Click OK.
Delete everything in the data folder Or other wise use all methods it will work out.
OR
click on this link
http://magicaljellybean.com/keyfinder/old.shtml
go here .. and download keyfinder v 1.51.zip
download that and open
and go to option change windows key
then enter this key
V2C47-MK7JD-3R89F-D2KXW-VPK3J
now
your windows key is now genuine and u’ll not get any such pop ups…..
If still your problem is not solved then search google for the windows genuine advantage validation removal tool and download it and install……That will surely remove the problem…..

Thursday, August 26, 2010

MS Word ShortCut

Command Name Shortcut Keys
 ------------------------------------------------------------------------

 All Caps CTRL+SHIFT+A
 Annotation ALT+CTRL+M
 App Maximize ALT+F10
 App Restore ALT+F5
 Apply Heading1 ALT+CTRL+1
 Apply Heading2 ALT+CTRL+2
 Apply Heading3 ALT+CTRL+3
 Apply List Bullet CTRL+SHIFT+L
 Auto Format ALT+CTRL+K
 Auto Text F3 or ALT+CTRL+V
 Bold CTRL+B or CTRL+SHIFT+B
 Bookmark CTRL+SHIFT+F5
 Browse Next CTRL+PAGE DOWN
 Browse Previous CTRL+PAGE UP
 Browse Sel ALT+CTRL+HOME
 Cancel ESC
 Center Para CTRL+E
 Change Case SHIFT+F3
 Char Left LEFT
 Char Left Extend SHIFT+LEFT
 Char Right RIGHT
 Char Right Extend SHIFT+RIGHT
 Clear DELETE
 Close or Exit ALT+F4
 Close Pane ALT+SHIFT+C
 Column Break CTRL+SHIFT+ENTER
 Column Select CTRL+SHIFT+F8
 Copy CTRL+C or CTRL+INSERT
 Copy Format CTRL+SHIFT+C
 Copy Text SHIFT+F2
 Create Auto Text ALT+F3
 Customize Add Menu ALT+CTRL+=
 Customize Keyboard ALT+CTRL+NUM +
 Customize Remove Menu ALT+CTRL+-
 Cut CTRL+X or SHIFT+DELETE
 Date Field ALT+SHIFT+D
 Delete Back Word CTRL+BACKSPACE
 Delete Word CTRL+DELETE
 Dictionary ALT+SHIFT+F7
 Do Field Click ALT+SHIFT+F9
 Doc Close CTRL+W or CTRL+F4
 Doc Maximize CTRL+F10
 Doc Move CTRL+F7
 Doc Restore CTRL+F5
 Doc Size CTRL+F8
 Doc Split ALT+CTRL+S
 Double Underline CTRL+SHIFT+D
 End of Column ALT+PAGE DOWN
 End of Column ALT+SHIFT+PAGE DOWN
 End of Doc Extend CTRL+SHIFT+END
 End of Document CTRL+END
 End of Line END
 End of Line Extend SHIFT+END
 End of Row ALT+END
 End of Row ALT+SHIFT+END
 End of Window ALT+CTRL+PAGE DOWN
 End of Window Extend ALT+CTRL+SHIFT+PAGE DOWN
 Endnote Now ALT+CTRL+D
 Extend Selection F8
 Field Chars CTRL+F9
 Field Codes ALT+F9
 Find CTRL+F
 Font CTRL+D or CTRL+SHIFT+F
 Font Size Select CTRL+SHIFT+P
 Footnote Now ALT+CTRL+F
 Go Back SHIFT+F5 or ALT+CTRL+Z
 Go To CTRL+G or F5
 Grow Font CTRL+SHIFT+.
 Grow Font One Point CTRL+]
 Hanging Indent CTRL+T
 Header Footer Link ALT+SHIFT+R
 Help F1
 Hidden CTRL+SHIFT+H
 Hyperlink CTRL+K
 Indent CTRL+M
 Italic CTRL+I or CTRL+SHIFT+I
 Justify Para CTRL+J
 Left Para CTRL+L
 Line Down DOWN
 Line Down Extend SHIFT+DOWN
 Line Up UP
 Line Up Extend SHIFT+UP
 List Num Field ALT+CTRL+L
 Lock Fields CTRL+3 or CTRL+F11
 Macro ALT+F8
 Mail Merge Check ALT+SHIFT+K
 Mail Merge Edit Data Source ALT+SHIFT+E 
 Mail Merge to Doc ALT+SHIFT+N
 Mail Merge to Printer ALT+SHIFT+M
 Mark Citation ALT+SHIFT+I
 Mark Index Entry ALT+SHIFT+X
 Mark Table of Contents Entry ALT+SHIFT+O
 Menu Mode F10
 Merge Field ALT+SHIFT+F
 Microsoft Script Editor ALT+SHIFT+F11
 Microsoft System Info ALT+CTRL+F1
 Move Text F2
 New CTRL+N
 Next Cell TAB
 Next Field F11 or ALT+F1
 Next Misspelling ALT+F7
 Next Object ALT+DOWN
 Next Window CTRL+F6 or ALT+F6
 Normal ALT+CTRL+N
 Normal Style CTRL+SHIFT+N or ALT+SHIFT+CLEAR (NUM 5)
 Open CTRL+O or CTRL+F12 or ALT+CTRL+F2
 Open or Close Up Para CTRL+0
 Other Pane F6 or SHIFT+F6
 Outline ALT+CTRL+O
 Outline Collapse ALT+SHIFT+- or ALT+SHIFT+NUM -
 Outline Demote ALT+SHIFT+RIGHT
 Outline Expand ALT+SHIFT+=
 Outline Expand ALT+SHIFT+NUM +
 Outline Move Down ALT+SHIFT+DOWN
 Outline Move Up ALT+SHIFT+UP
 Outline Promote ALT+SHIFT+LEFT
 Outline Show First Line ALT+SHIFT+L
 Overtype INSERT
 Page ALT+CTRL+P
 Page Break CTRL+ENTER
 Page Down PAGE DOWN
 Page Down Extend SHIFT+PAGE DOWN
 Page Field ALT+SHIFT+P
 Page Up PAGE UP
 Page Up Extend SHIFT+PAGE UP
 Para Down CTRL+DOWN
 Para Down Extend CTRL+SHIFT+DOWN
 Para Up CTRL+UP
 Para Up Extend CTRL+SHIFT+UP
 Paste CTRL+V or SHIFT+INSERT
 Paste Format CTRL+SHIFT+V
 Prev Cell SHIFT+TAB
 Prev Field SHIFT+F11 or ALT+SHIFT+F1
 Prev Object ALT+UP
 Prev Window CTRL+SHIFT+F6 or ALT+SHIFT+F6
 Print CTRL+P or CTRL+SHIFT+F12
 Print Preview CTRL+F2 or ALT+CTRL+I
 Proofing F7
 Redo ALT+SHIFT+BACKSPACE
 Redo or Repeat CTRL+Y or F4 or ALT+ENTER
 Repeat Find SHIFT+F4 or ALT+CTRL+Y
 Replace CTRL+H
 Reset Char CTRL+SPACE or CTRL+SHIFT+Z
 Reset Para CTRL+Q
 Revision Marks Toggle CTRL+SHIFT+E
 Right Para CTRL+R
 Save CTRL+S or SHIFT+F12 or ALT+SHIFT+F2
 Save As F12
 Select All CTRL+A or CTRL+CLEAR (NUM 5) or CTRL+NUM 5
 Select Table ALT+CLEAR (NUM 5)
 Show All CTRL+SHIFT+8
 Show All Headings ALT+SHIFT+A
 Show Heading1 ALT+SHIFT+1
 Show Heading2 ALT+SHIFT+2
 Show Heading3 ALT+SHIFT+3
 Show Heading4 ALT+SHIFT+4
 Show Heading5 ALT+SHIFT+5
 Show Heading6 ALT+SHIFT+6
 Show Heading7 ALT+SHIFT+7
 Show Heading8 ALT+SHIFT+8
 Show Heading9 ALT+SHIFT+9
 Shrink Font CTRL+SHIFT+,
 Shrink Font One Point CTRL+[
 Small Caps CTRL+SHIFT+K
 Space Para1 CTRL+1
 Space Para15 CTRL+5
 Space Para2 CTRL+2
 Spike CTRL+SHIFT+F3 or CTRL+F3
 Start of Column ALT+PAGE UP
 Start of Column ALT+SHIFT+PAGE UP
 Start of Doc Extend CTRL+SHIFT+HOME
 Start of Document CTRL+HOME
 Start of Line HOME
 Start of Line Extend SHIFT+HOME
 Start of Row ALT+HOME
 Start of Row ALT+SHIFT+HOME
 Start of Window ALT+CTRL+PAGE UP
 Start of Window Extend ALT+CTRL+SHIFT+PAGE UP
 Style CTRL+SHIFT+S
 Subscript CTRL+=
 Superscript CTRL+SHIFT+=
 Symbol Font CTRL+SHIFT+Q
 Thesaurus SHIFT+F7
 Time Field ALT+SHIFT+T
 Toggle Field Display SHIFT+F9
 Toggle Master Subdocs CTRL+\ 
 Tool SHIFT+F1
 Un Hang CTRL+SHIFT+T
 Un Indent CTRL+SHIFT+M
 Underline CTRL+U or CTRL+SHIFT+U
 Undo CTRL+Z or ALT+BACKSPACE
 Unlink Fields CTRL+6 or CTRL+SHIFT+F9
 Unlock Fields CTRL+4 or CTRL+SHIFT+F11
 Update Auto Format ALT+CTRL+U
 Update Fields F9 or ALT+SHIFT+U
 Update Source CTRL+SHIFT+F7
 VBCode ALT+F11
 Web Go Back ALT+LEFT
 Web Go Forward ALT+RIGHT
 Word Left CTRL+LEFT
 Word Left Extend CTRL+SHIFT+LEFT
 Word Right CTRL+RIGHT
 Word Right Extend CTRL+SHIFT+RIGHT
 Word Underline CTRL+SHIFT+W

5 tricks to make ur pc as ROCKET >----------->

Boost up ur pc
     is your pc running slow ?
      your facing problems with slow run of your pc ?
          Then here you can find all sollutions to your problems !
              you will be free from all of your problems keep your pc with rocket speed !

https://blogger.googleusercontent.com/img/b/R29vZ2xl/AVvXsEjoYZJ9HNK_Kd79nmFf9dd7nD0gEFSnFe46bSyIodQOMJlj8KJH3q0Kki5-WXOJT0Q9l3y1UQQhRN_kW_lNpTwAlgSAkeKgVVEsylq2viBhZc9D7G1r9rkOWja87tFsUZ2rNrfMO2-hmtSW/s400/speed-up-computer.jpg

5 ways to speed up your PC

By following a few simple guidelines, you can maintain your computer and keep it running smoothly. This article discusses how to use the tools available in Windows XP Service Pack 3 (SP3) and Windows Vista to more efficiently maintain your computer and safeguard your privacy when you're online.

On This Page
Free up disk spaceFree up disk space
Speed up access to dataSpeed up access to data
Detect and repair disk errorsDetect and repair disk errors
Protect your computer against spywareProtect your computer against spyware
Learn all about ReadyBoostLearn all about ReadyBoost

Free up disk space

By freeing disk space, you can improve the performance of your computer. The Disk Cleanup tool helps you free up space on your hard disk. The utility identifies files that you can safely delete, and then enables you to choose whether you want to delete some or all of the identified files.
Use Disk Cleanup to:
•Remove temporary Internet files.
•Remove downloaded program files (such as Microsoft ActiveX controls and Java applets).
•Empty the Recycle Bin.
•Remove Windows temporary files.
•Remove optional Windows components that you don't use.
•Remove installed programs that you no longer use.
Tip: Typically, temporary Internet files take the most amount of space because the browser caches each page you visit for faster access later.
To use Disk Cleanup

1.
Click Start, point to All Programs, point to Accessories, point to System Tools, and then click Disk Cleanup. If several drives are available, you might be prompted to specify which drive you want to clean.

Image of Disk Cleanup dialog box

2.

In the Disk Cleanup for dialog box, scroll through the content of the Files to delete list.
Image of Disk Cleanup for dialog box
Choose the files that you want to delete.
3.
Clear the check boxes for files that you don't want to delete, and then click OK.
4.
When prompted to confirm that you want to delete the specified files, click Yes.
After a few minutes, the process completes and the Disk Cleanup dialog box closes, leaving your computer cleaner and performing better.

Speed up access to data

Disk fragmentation slows the overall performance of your system. When files are fragmented, the computer must search the hard disk when the file is opened to piece it back together. The response time can be significantly longer.
Disk Defragmenter is a Windows utility that consolidates fragmented files and folders on your computer's hard disk so that each occupies a single space on the disk. With your files stored neatly end-to-end, without fragmentation, reading and writing to the disk speeds up.

When to run Disk Defragmenter
In addition to running Disk Defragmenter at regular intervals—monthly is optimal—there are other times you should run it too, such as when:

  • You add a large number of files.

  • Your free disk space totals 15 percent or less.

  • You install new programs or a new version of Windows.

To use Disk Defragmenter:
1.
Click Start, point to All Programs, point to Accessories, point to System Tools, and then click Disk Defragmenter.

Image of the Disk Defragmenter dialog box
Click Analyze to start the Disk Defragmenter.
2.
In the Disk Defragmenter dialog box, click the drives that you want to defragment, and then click the Analyze button. After the disk is analyzed, a dialog box appears, letting you know whether you should defragment the analyzed drives.
Tip: You should analyze a volume before defragmenting it to get an estimate of how long the defragmentation process will take.
3.
To defragment the selected drive or drives, click the Defragment button. Note: In Windows Vista, there is no graphical user interface to demonstrate the progress—but your hard drive is still being defragmented.
After the defragmentation is complete, Disk Defragmenter displays the results.
4.
To display detailed information about the defragmented disk or partition, click View Report.
5.
To close the View Report dialog box, click Close.
6.To close the Disk Defragmenter utility, click the Close button on the title bar of the window.

Detect and repair disk errors

In addition to running Disk Cleanup and Disk Defragmenter to optimize the performance of your computer, you can check the integrity of the files stored on your hard disk by running the Error Checking utility.
As you use your hard drive, it can develop bad sectors. Bad sectors slow down hard disk performance and sometimes make data writing (such as file saving) difficult, or even impossible. The Error Checking utility scans the hard drive for bad sectors, and scans for file system errors to see whether certain files or folders are misplaced.
If you use your computer daily, you should run this utility once a week to help prevent data loss.

To run the Checking utility:

1.Close all open files.
2.Click Start, and then click My Computer.
3.In the My Computer window, right-click the hard disk you want to search for bad sectors, and then click Properties.
4.In the Properties dialog box, click the Tools tab.
5.Click the Check Now button.
6.
In the Check Disk dialog box, select the Scan for and attempt recovery of bad sectors check box, and then click Start.

Image of Check Disk dialog box
7.If bad sectors are found, choose to fix them.
Tip: Only select the "Automatically fix file system errors" check box if you think that your disk contains bad sectors.

Protect your computer against spyware

Spyware collects personal information without letting you know and without asking for permission. From the Web sites you visit to usernames and passwords, spyware can put you and your confidential information at risk. In addition to privacy concerns, spyware can hamper your computer's performance. To combat spyware, you might want to consider using Microsoft Windows Defender, which is included in Windows Vista, and is available as a free download for Microsoft XP SP2. Alternatively, there are other free anti-spyware software programs available.

Learn all about ReadyBoost

If you're using Windows Vista, you can use ReadyBoost to speed up your system. A new concept in adding memory to a system, it allows you to use non-volatile flash memory—like a USB flash drive or a memory card—to improve performance without having to add additional memory.

Wednesday, August 25, 2010

MS Excel - Useful Shortcut Keys

                  MS Excel  - Useful Shortcut Keys                


Ctrl+A
Select All
None
Ctrl+B
Bold
Format, Cells, Font, Font Style, Bold
Ctrl+C
Copy
Edit, Copy
Ctrl+D
Fill Down
Edit, Fill, Down
Ctrl+F
Find
Edit, Find
Ctrl+G
Goto
Edit, Goto
Ctrl+H
Replace
Edit, Replace
Ctrl+I
Italic
Format, Cells, Font, Font Style, Italic
Ctrl+K
Insert Hyperlink
Insert, Hyperlink
Ctrl+N
New Workbook
File, New
Ctrl+O
Open
File, Open
Ctrl+P
Print
File, Print
Ctrl+R
Fill Right
Edit, Fill Right
Ctrl+S
Save
File, Save
Ctrl+U
Underline
Format, Cells, Font, Underline, Single
Ctrl+V
Paste
Edit, Paste
Ctrl W
Close
File, Close
Ctrl+X
Cut
Edit, Cut
Ctrl+Y
Repeat
Edit, Repeat
Ctrl+Z
Undo
Edit, Undo
F1
Help
Help, Contents and Index
F2
Edit
None
F3
Paste Name
Insert, Name, Paste
F4
Repeat last action
Edit, Repeat. Works while not in Edit mode.
F4
While typing a formula, switch between absolute/relative refs
None
F5
Goto
Edit, Goto
F6
Next Pane
None
F7
Spell check
Tools, Spelling
F8
Extend mode
None
F9
Recalculate all workbooks
Tools, Options, Calculation, Calc,Now
F10
Activate Menubar
N/A
F11
New Chart
Insert, Chart
F12
Save As
File, Save As
Ctrl+:
Insert Current Time
None
Ctrl+;
Insert Current Date
None
Ctrl+"
Copy Value from Cell Above
Edit, Paste Special, Value
Ctrl+’
Copy Fromula from Cell Above
Edit, Copy
Shift
Hold down shift for additional functions in Excel’s menu
none
Shift+F1
What’s This?
Help, What’s This?
Shift+F2
Edit cell comment
Insert, Edit Comments
Shift+F3
Paste function into formula
Insert, Function
Shift+F4
Find Next
Edit, Find, Find Next
Shift+F5
Find
Edit, Find, Find Next
Shift+F6
Previous Pane
None
Shift+F8
Add to selection
None
Shift+F9
Calculate active worksheet
Calc Sheet
Shift+F10
Display shortcut menu
None
Shift+F11
New worksheet
Insert, Worksheet
Shift+F12
Save
File, Save
Ctrl+F3
Define name
Insert, Names, Define
Ctrl+F4
Close
File, Close
Ctrl+F5
XL, Restore window size
Restore
Ctrl+F6
Next workbook window
Window, ...
Shift+Ctrl+F6
Previous workbook window
Window, ...
Ctrl+F7
Move window
XL, Move
Ctrl+F8
Resize window
XL, Size
Ctrl+F9
Minimize workbook
XL, Minimize
Ctrl+F10
Maximize or restore window
XL, Maximize
Ctrl+F11
Inset 4.0 Macro sheet
None in Excel 97. In versions prior to 97 - Insert, Macro, 4.0 Macro
Ctrl+F12
File Open
File, Open
Alt+F1
Insert Chart
Insert, Chart...
Alt+F2
Save As
File, Save As
Alt+F4
Exit
File, Exit
Alt+F8
Macro dialog box
Tools, Macro, Macros in Excel 97 Tools,Macros - in earlier versions
Alt+F11
Visual Basic Editor
Tools, Macro, Visual Basic Editor
Ctrl+Shift+F3
Create name by using names of row and column labels
Insert, Name, Create
Ctrl+Shift+F6
Previous Window
Window, ...
Ctrl+Shift+F12
Print
File, Print
Alt+Shift+F1
New worksheet
Insert, Worksheet
Alt+Shift+F2
Save
File, Save
Alt+=
AutoSum
No direct equivalent
Ctrl+`
Toggle Value/Formula display
Tools, Options, View, Formulas
Ctrl+Shift+A
Insert argument names into formula
No direct equivalent
Alt+Down arrow
Display AutoComplete list
None
Alt+’
Format Style dialog box
Format, Style
Ctrl+Shift+~
General format
Format, Cells, Number, Category, General
Ctrl+Shift+!
Comma format
Format, Cells, Number, Category, Number
Ctrl+Shift+@
Time format
Format, Cells, Number, Category, Time
Ctrl+Shift+#
Date format
Format, Cells, Number, Category, Date
Ctrl+Shift+$
Currency format
Format, Cells, Number, Category, Currency
Ctrl+Shift+%
Percent format
Format, Cells, Number, Category, Percentage
Ctrl+Shift+^
Exponential format
Format, Cells, Number, Category,
Ctrl+Shift+&
Place outline border around selected cells
Format, Cells, Border
Ctrl+Shift+_
Remove outline border
Format, Cells, Border
Ctrl+Shift+*
Select current region
Edit, Goto, Special, Current Region
Ctrl++
Insert
Insert, (Rows, Columns, or Cells) Depends on selection
Ctrl+-
Delete
Delete, (Rows, Columns, or Cells) Depends on selection
Ctrl+1
Format cells dialog box
Format, Cells
Ctrl+2
Bold
Format, Cells, Font, Font Style, Bold
Ctrl+3
Italic
Format, Cells, Font, Font Style, Italic
Ctrl+4
Underline
Format, Cells, Font, Font Style, Underline
Ctrl+5
Strikethrough
Format, Cells, Font, Effects, Strikethrough
Ctrl+6
Show/Hide objects
Tools, Options, View, Objects, Show All/Hide
Ctrl+7
Show/Hide Standard toolbar
View, Toolbars, Stardard
Ctrl+8
Toggle Outline symbols
None
Ctrl+9
Hide rows
Format, Row, Hide
Ctrl+0
Hide columns
Format, Column, Hide
Ctrl+Shift+(
Unhide rows
Format, Row, Unhide
Ctrl+Shift+)
Unhide columns
Format, Column, Unhide
Alt or F10
Activate the menu
None
Ctrl+Tab
In toolbar: next toolbar
None
Shift+Ctrl+Tab
In toolbar: previous toolbar
None
Ctrl+Tab
In a workbook: activate next workbook
None
Shift+Ctrl+Tab
In a workbook: activate previous workbook
None
Tab
Next tool
None
Shift+Tab
Previous tool
None
Enter
Do the command
None
Shift+Ctrl+F
Font Drop Down List
Format, Cells, Font
Shift+Ctrl+F+ F
Font tab of Format Cell Dialog box
Format, Cells, Font
Shift+Ctrl+P
Point size Drop Down List
Format, Cells, Font
 
 
- CTRL combination shortcut keys -
- Key Description -
 
CTRL+( Unhides any hidden rows within the selection. 
CTRL+) Unhides any hidden columns within the selection. 
CTRL+& Applies the outline border to the selected cells. 
CTRL+_ Removes the outline border from the selected cells. 
CTRL+~ Applies the General number format. 
CTRL+$ Applies the Currency format with two decimal places (negative numbers in parentheses) . 
CTRL+% Applies the Percentage format with no decimal places. 
CTRL+^ Applies the Exponential number format with two decimal places. 
CTRL+# Applies the Date format with the day, month, and year. 
CTRL+@ Applies the Time format with the hour and minute, and AM or PM. 
CTRL+! Applies the Number format with two decimal places, thousands separator, and minus sign (-) for negative values. 
CTRL+- Displays the Delete dialog box to delete the selected cells. 
CTRL+* Selects the current region around the active cell (the data area enclosed by blank rows and blank columns).
In a PivotTable, it selects the entire PivotTable report.

CTRL+: Enters the current time. 
CTRL+; Enters the current date. 
CTRL+` Alternates between displaying cell values and displaying formulas in the worksheet. 
CTRL+' Copies a formula from the cell above the active cell into the cell or the Formula Bar. 
CTRL+" Copies the value from the cell above the active cell into the cell or the Formula Bar. 
CTRL++ Displays the Insert dialog box to insert blank cells. 
CTRL+1 Displays the Format Cells dialog box. 
CTRL+2 Applies or removes bold formatting. 
CTRL+3 Applies or removes italic formatting. 
CTRL+4 Applies or removes underlining. 
CTRL+5 Applies or removes strikethrough. 
CTRL+6 Alternates between hiding objects, displaying objects, and displaying placeholders for objects. 
CTRL+7 Displays or hides the Standard toolbar. 
CTRL+8 Displays or hides the outline symbols. 
CTRL+9 Hides the selected rows. 
CTRL+0 Hides the selected columns. 
CTRL+A Selects the entire worksheet. 
If the worksheet contains data, CTRL+A selects the current region. Pressing CTRL+A a second time selects the entire worksheet.


When the insertion point is to the right of a function name in a formula, displays the Function Arguments dialog box.

CTRL+SHIFT+A inserts the argument names and parentheses when the insertion point is to the right of a function name in a formula.
CTRL+B Applies or removes bold formatting. 
CTRL+C Copies the selected cells. 
CTRL+C followed by another CTRL+C displays the Microsoft Office Clipboard.
CTRL+D Uses the Fill Down command to copy the contents and format of the topmost cell of a selected range into the cells below. 
CTRL+F Displays the Find dialog box. 
SHIFT+F5 also displays this dialog box, while SHIFT+F4 repeats the last Find action.
CTRL+G Displays the Go To dialog box. 
F5 also displays this dialog box.

CTRL+H Displays the Find and Replace dialog box. 
CTRL+I Applies or removes italic formatting. 
CTRL+K Displays the Insert Hyperlink dialog box for new hyperlinks or the Edit Hyperlink dialog box for selected existing hyperlinks. 
CTRL+L Displays the Create List dialog box. 
CTRL+N Creates a new, blank file. 
CTRL+O Displays the Open dialog box to open or find a file.
CTRL+SHIFT+O selects all cells that contain comments.
CTRL+P Displays the Print dialog box. 
CTRL+R Uses the Fill Right command to copy the contents and format of the leftmost cell of a selected range into the cells to the right. 
CTRL+S Saves the active file with its current file name, location, and file format. 
CTRL+U Applies or removes underlining. 
CTRL+V Inserts the contents of the Clipboard at the insertion point and replaces any selection. Available only after you cut or copied an object, text, or cell contents. 
CTRL+W Closes the selected workbook window. 
CTRL+X Cuts the selected cells. 
CTRL+Y Repeats the last command or action, if possible. 
CTRL+Z Uses the Undo command to reverse the last command or to delete the last entry you typed.
CTRL+SHIFT+Z uses the Undo or Redo command to reverse or restore the last automatic correction when AutoCorrect Smart Tags are displayed.

-
Function keys -
 
F1 Displays the Help task pane.
CTRL+F1 closes and reopens the current task pane.
ALT+F1 creates a chart of the data in the current range.
ALT+SHIFT+F1 inserts a new worksheet.
F2 Edits the active cell and positions the insertion point at the end of the cell contents. It also moves the insertion point into the Formula Bar when editing in a cell is turned off.
SHIFT+F2 edits a cell comment.
F3 Pastes a defined name into a formula.
SHIFT+F3 displays the Insert Function dialog box.

F4 Repeats the last command or action, if possible.
CTRL+F4 closes the selected workbook window.

F5 Displays the Go To dialog box.
CTRL+F5 restores the window size of the selected workbook window.

F6 Switches to the next pane in a worksheet that has been split (Window menu, Split command).
SHIFT+F6 switches to the previous pane in a worksheet that has been split.
CTRL+F6 switches to the next workbook window when more than one workbook window is open.

Note When the task pane is visible, F6 and SHIFT+F6 include that pane when switching between panes.

F7 Displays the Spelling dialog box to check spelling in the active worksheet or selected range.
CTRL+F7 performs the Move command on the workbook window when it is not maximized. Use the arrow keys to move the window, and when finished press ESC.

F8 Turns extend mode on or off. In extend mode, EXT appears in the status line, and the arrow keys extend the selection.

SHIFT+F8 enables you to add a non-adjacent cell or range to a selection of cells by using the arrow keys.
CTRL+F8 performs the Size command (on the Control menu for the workbook window) when a workbook is not maximized.
ALT+F8 displays the Macro dialog box to run, edit, or delete a macro.
F9 Calculates all worksheets in all open workbooks.
F9 followed by ENTER (or followed by CTRL+SHIFT+ENTER for array formulas) calculates the selected a portion of a formula and replaces the selected portion with the calculated value.
SHIFT+F9 calculates the active worksheet.
CTRL+ALT+F9 calculates all worksheets in all open workbooks, regardless of whether they have changed since the last calculation.
CTRL+ALT+SHIFT+ F9 rechecks dependent formulas, and then calculates all cells in all open workbooks, including cells not marked as needing to be calculated.
CTRL+F9 minimizes a workbook window to an icon.
F10 Selects the menu bar or closes an open menu and submenu at the same time.
SHIFT+F10 displays the shortcut menu for a selected item.

ALT+SHIFT+F10 displays the menu or message for a smart tag. If more than one smart tag is present, it switches to the next smart tag and displays its menu or message.
CTRL+F10 maximizes or restores the selected workbook window.
F11 Creates a chart of the data in the current range.
SHIFT+F11 inserts a new worksheet.

ALT+F11 opens the Visual Basic Editor, in which you can create a macro by using Visual Basic for Applications (VBA).
ALT+SHIFT+F11 opens the Microsoft Script Editor, where you can add text, edit HTML tags, and modify any script code.
F12 Displays the Save As dialog box. 

-
Other useful shortcut keys -
 
ARROW KEYS Move one cell up, down, left, or right in a worksheet. 
CTRL+ARROW KEY moves to the edge of the current data region (data region: A range of cells that contains data and that is bounded by empty cells or datasheet borders.) in a worksheet.
SHIFT+ARROW KEY extends the selection of cells by one cell.
CTRL+SHIFT+ARROW KEY extends the selection of cells to the last nonblank cell in the same column or row as the active cell.
LEFT ARROW or RIGHT ARROW selects the menu to the left or right when a menu is visible. When a submenu is open, these arrow keys switch between the main menu and the submenu.
DOWN ARROW or UP ARROW selects the next or previous command when a menu or submenu is open.

In a dialog box, arrow keys move between options in an open drop-down list, or between options in a group of options.

ALT+DOWN ARROW opens a selected drop-down list.
BACKSPACE Deletes one character to the left in the Formula Bar.
Also clears the content of the active cell.

DELETE Removes the cell contents (data and formulas) from selected cells without affecting cell formats or comments. 
In cell editing mode, it deletes the character to the right of the insertion point. 

END Moves to the cell in the lower-right corner of the window when SCROLL LOCK is turned on.
Also selects the last command on the menu when a menu or submenu is visible.

CTRL+END moves to the last cell on a worksheet, in the lowest used row of the rightmost used column.
CTRL+SHIFT+END extends the selection of cells to the last used cell on the worksheet (lower-right corner).
ENTER Completes a cell entry from the cell or the Formula Bar, and selects the cell below (by default).
In a data form, it moves to the first field in the next record.


Opens a selected menu (press F10 to activate the menu bar) or performs the action for a selected command.


In a dialog box, it performs the action for the default command button in the dialog box (the button with the bold outline, often the OK button).

ALT+ENTER starts a new line in the same cell.
CTRL+ENTER fills the selected cell range with the current entry.
SHIFT+ENTER completes a cell entry and selects the cell above.
ESC Cancels an entry in the cell or Formula Bar. 
It also closes an open menu or submenu, dialog box, or message window.

HOME Moves to the beginning of a row in a worksheet.
Moves to the cell in the upper-left corner of the window when SCROLL LOCK is turned on.


Selects the first command on the menu when a menu or submenu is visible.

CTRL+HOME moves to the beginning of a worksheet.
CTRL+SHIFT+HOME extends the selection of cells to the beginning of the worksheet.
PAGE DOWN Moves one screen down in a worksheet. 
ALT+PAGE DOWN moves one screen to the right in a worksheet.
CTRL+PAGE DOWN moves to the next sheet in a workbook.
CTRL+SHIFT+PAGE DOWN selects the current and next sheet in a workbook.
PAGE UP Moves one screen up in a worksheet.
ALT+PAGE UP moves one screen to the left in a worksheet.
CTRL+PAGE UP moves to the previous sheet in a workbook.
CTRL+SHIFT+PAGE UP selects the current and previous sheet in a workbook.
SPACEBAR In a dialog box, performs the action for the selected button, or selects or clears a check box.
CTRL+SPACEBAR selects an entire column in a worksheet.
SHIFT+SPACEBAR selects an entire row in a worksheet.
CTRL+SHIFT+SPACEBAR selects the entire worksheet. 

If the worksheet contains data, CTRL+SHIFT+SPACEBAR selects the current region. Pressing CTRL+SHIFT+SPACEBAR a second time selects the entire worksheet. 

When an object is selected, CTRL+SHIFT+SPACEBAR selects all objects on a worksheet.

ALT+SPACEBAR displays the Control menu for the Excel window.

TAB Moves one cell to the right in a worksheet.
Moves between unlocked cells in a protected worksheet.


Moves to the next option or option group in a dialog box.

SHIFT+TAB moves to the previous cell in a worksheet or the previous option in a dialog box.
CTRL+TAB switches to the next tab in dialog box.
CTRL+SHIFT+TAB switches to the previous tab in a dialog box.
Related Posts with Thumbnails